What You’ll Build + Learn
Kids turn stored air into motion by building and testing a balloon-powered car. They compare designs, adjust for speed and stability, and practice using evidence from each test to improve the next version.
Quick Facts
- Best for: Elementary builders
- Time: 45-60 minutes
- Skills: Physics, trial-and-error, fine motor skills
- Core idea: Testing and refining a design to harness potential energy
What happens when you mix a classic physics experiment with a pile of bricks and a room full of eager makers? You get a high-energy workshop where kids learn how to transform trapped air into speed.
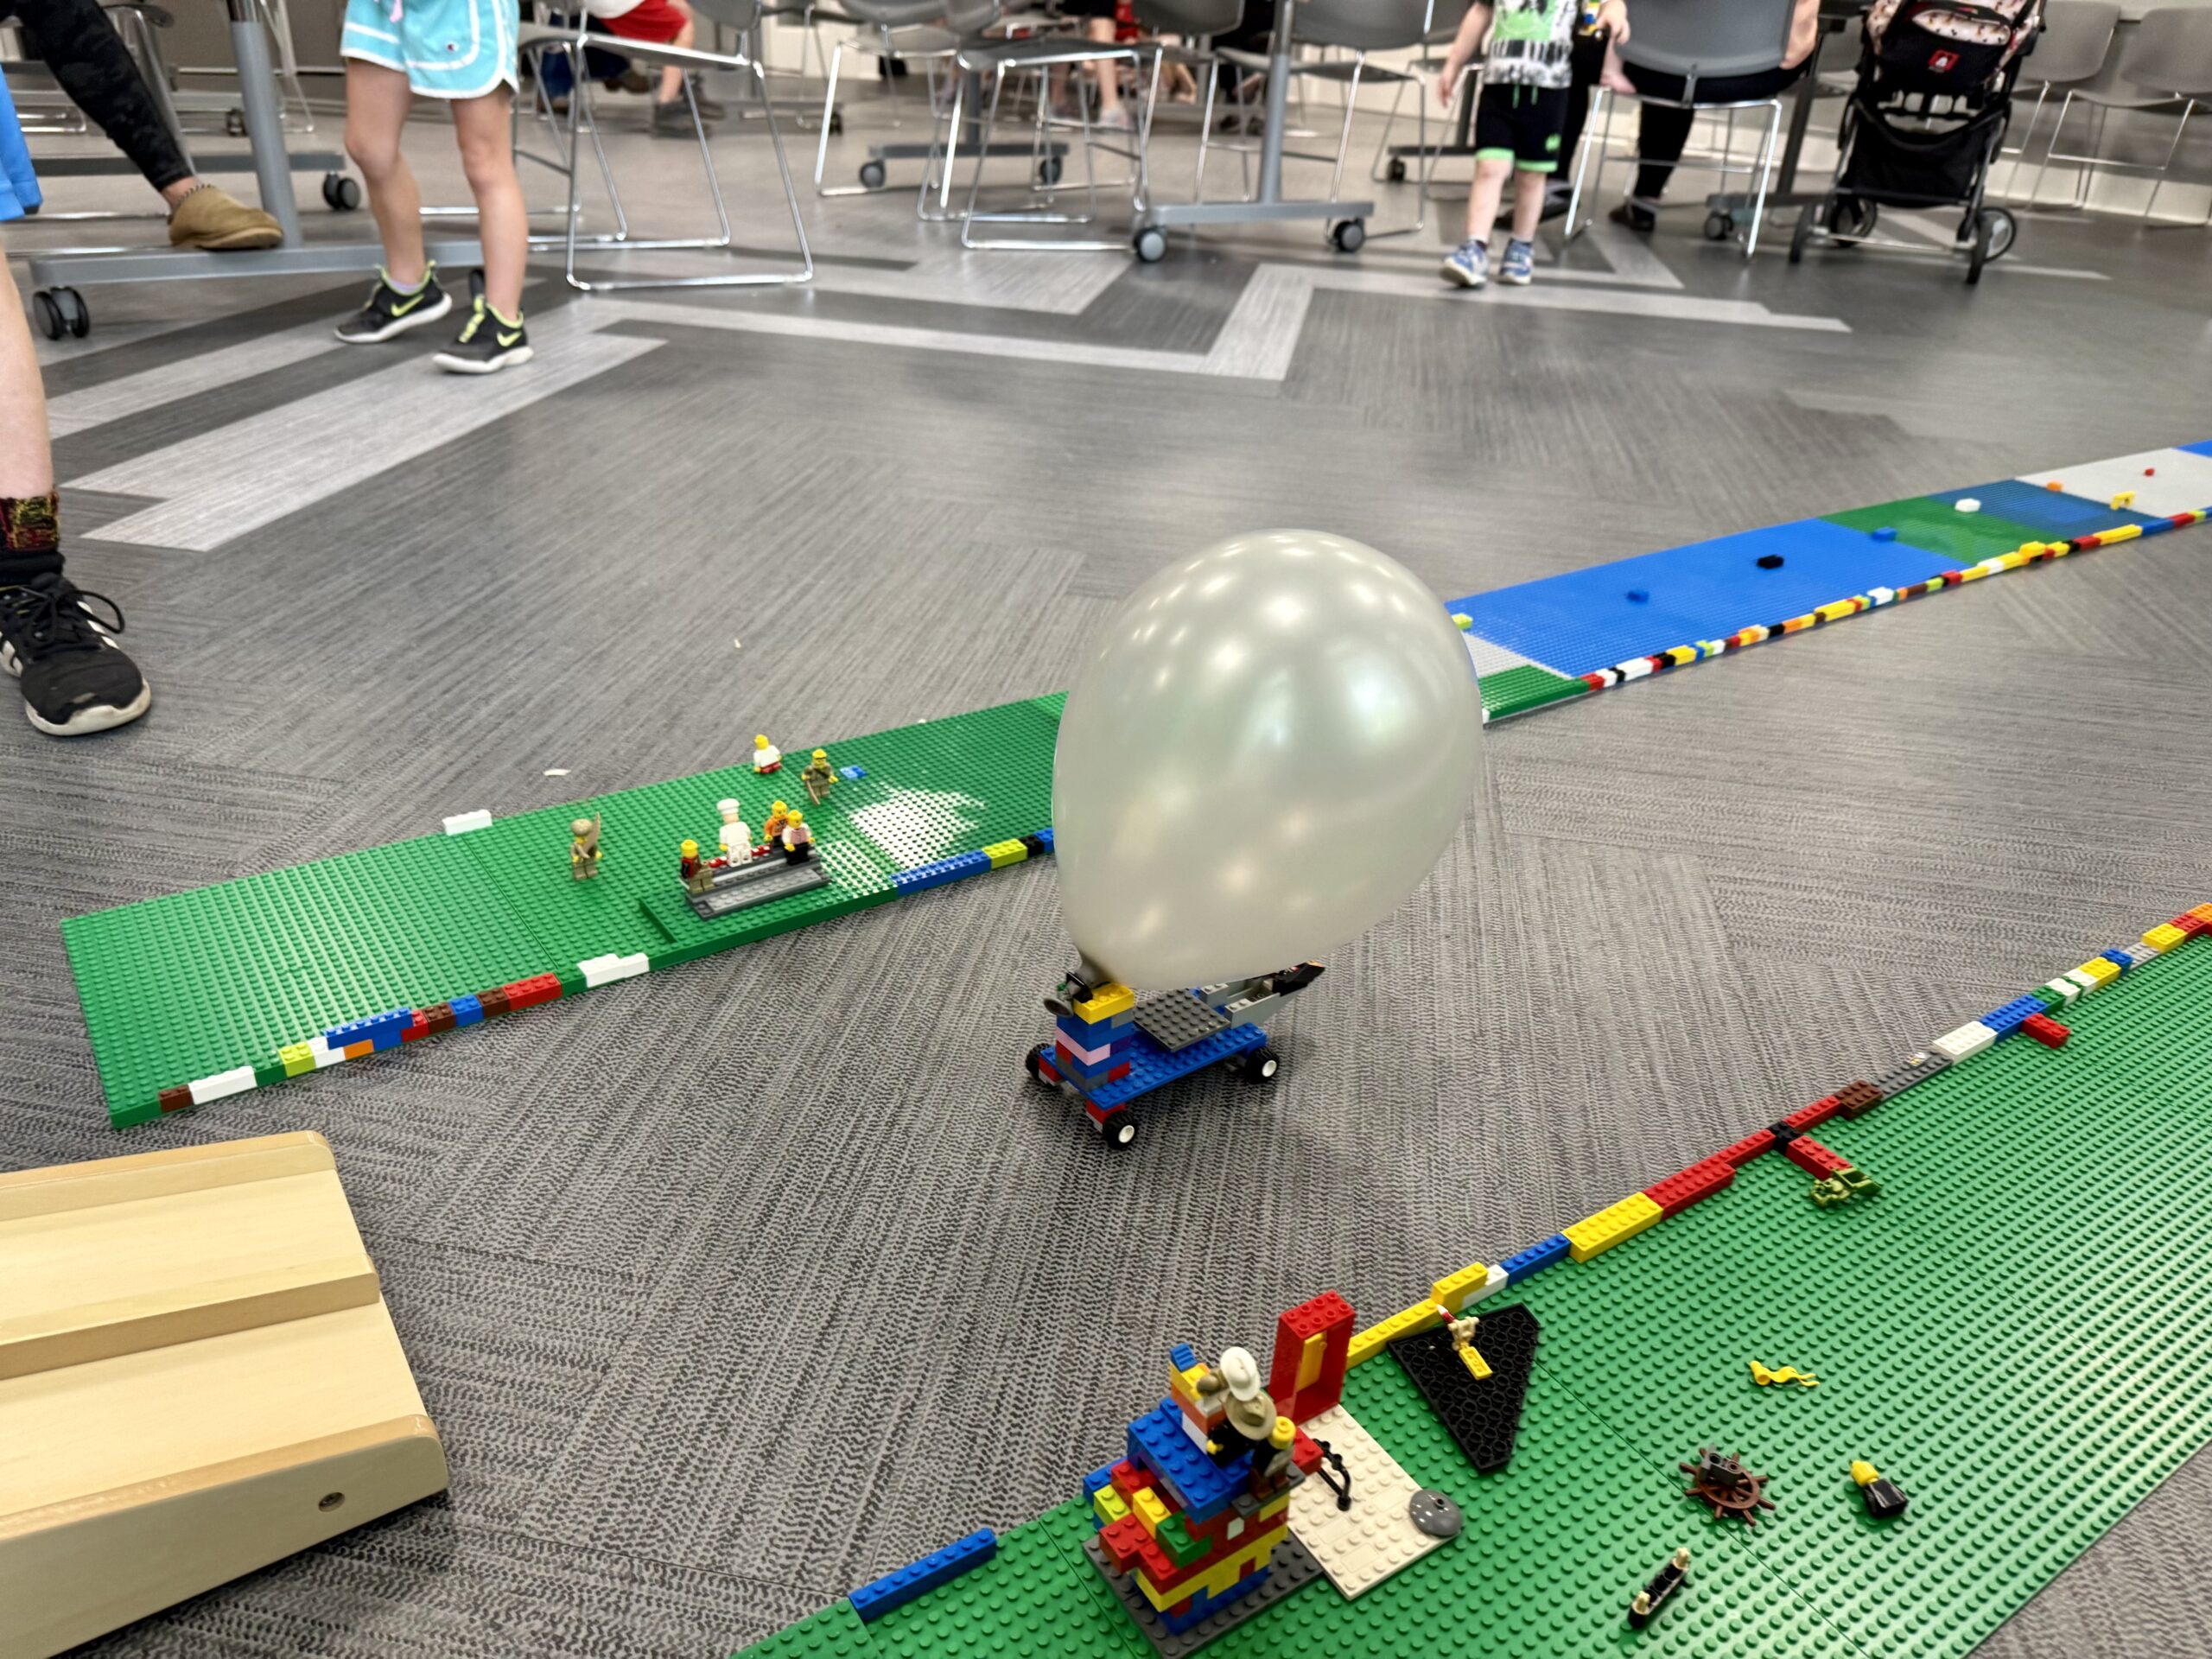
The project challenged kids to build a Lego balloon car capable of zooming down a custom racetrack. Along the way, they had to navigate structural stability, think about propulsion, and embrace the core rule of engineering; try, try again.
Disclosure: This post may include affiliate links. If you buy through a link, Read Build Discover may earn a small commission at no extra cost to you.
Read: Books That Support the Build
Before the wheels roll, connect the activity to books that highlight the evolution of automobiles and the determination needed to cross the finish line.
- Book: Going Places by Peter and Paul Reynolds. The highest-performing balloon cars in this lab will likely look awkward! This exceptional story perfectly prepares students to think outside the traditional “car” blueprint. It gives them permission to prioritize mechanical function over aesthetic form, setting the stage for creative engineering. If you only choose one book, this is it!
- Book: The Most Magnificent Thing by Ashley Spires. This brilliantly written story appeals perfectly to upper-elementary students. It is an ideal hook for introducing both the engineering design process and the emotional resilience needed when prototypes fail during testing.
- Book: Hot Rod Hamster by Cynthia Lord. A highly interactive, fun choice for younger readers. It asks the audience “What would you choose?” to build a custom hot rod, making it the perfect tie-in for a design unit.
- Book: Car (How It’s Built) by Becky Herrick. A thoughtfully detailed book that provides a clear overview for young readers curious about how vehicles are manufactured in the real world [AbeBooks, Amazon, Goodreads].
- Book: Elbow Grease by John Cena. A beloved story that teaches important lessons about gumption, persistence, and keeping a positive attitude when your design faces setbacks.
Build: The Balloon Car Challenge
The objective seemed simple: build a LEGO car propelled entirely by the air escaping from an inflated balloon. However, navigating this task required the kids to think like real mechanical engineers.
To set them up for success, we kicked off the session with two critical design tips:
- Extend the Frame: The car chassis needed to be long enough to support the full length of an inflated balloon without tipping over or rubbing against the wheels.
- Align the Exhaust: The mouth of the ballon had to point directly backward, mimicking a real exhaust pipe, to push the car forward.
The biggest breakthrough came when a child chose to let go of standard car aesthetics. The most successful builds were long, wonderfully awkward, and optimized for function over curb appeal!
This shift from form to function perfectly mirrors what we discovered in The LEGO Zipline Challenge: A Hands-On Lab in Flight and Resilience, where builders similarly had to abandon pretty, aesthetic designs and embrace the iterative engineering process to keep their models balanced on the line.
For kids who arrived early, or wanted to do something other than build the cars, there was a collaborative project of building the race track. They actively collaborated to design a bustling “spectator area” with baseplates flanking the lanes to create a unified racetrack. We then used these baseplates to gather distance data without any extra tools. The baseplates functioned perfectly as non-standard units of measurement. As each car zoomed down the lane and sputtered out, kids simply counted how many baseplate lengths it traveled, bridging physical engineering directly with tangible math.
The Helpful Pieces: Hand Pumps & Clamps
Two specific tools kept this workship running safely and smoothly.
- Dual-Action Hand Balloon Pumps
While automatic electric pumps are fast, they are far too loud for a public library setting. Instead, we used manual, dual-action handheld balloon pumps. These are excellent because the nozzles feature built-in plastic ridges that grip the balloon neck securely while pumping. Many of the kids were using them independently in no time.- Where to find them: You can view the exact handheld model on Amazon.
- Where to find them: You can view the exact handheld model on Amazon.
- The LEGO 1×2 Clamp (Element 6021208)
Initially, a prototype anchor was made by bridging two small bricks over a long brick to leave an opening for the balloon. However, as the balloons expanded, the pressure turned the top brick bridge into a hazardous flying projectile!
Switching to a secure, one-piece connection resolved the safety issue entirely. The LEGO 1×2 clamp holds the balloon mouth firmly in place against the chassis without popping apart under pressure.- Where to find them: Search element ID 6021208 on the official LEGO Pick a Brick service.
Discover: Questions to Ask After the Build
- Which design features helped the cars travel in a straight line without spinning out?
- How did the weight and length of your vehicle change how far it could roll?
Lessons for Next Time: Ditch the Ramp!
If you replicate this activity at home or in a classroom, skip the starting ramp entirely!
While a ramp sounds like a good way to give struggling cars an initial boost, it ended up bottlenecking the track and getting in the way of the actual physics lesson. The extra gravity assist slowed down the natural momentum of the air propulsion.
Next time, keeping the entire track perfectly flat will allow for head-to-head racing, leaning directly into the competitive excitement the kids already brought to the table.
Continue the Learning at Home
Recording the distances cars traveled sets up a perfect data-science extension for home or the classroom.
- Individual Improvement: Kids can track how their car’s performance changed as they made modifications.
- Group Comparison: Take the best performance from each racer and create a graph that shows the average car performance.
You could do this directly in the classroom. Build a simple graph on a dry erase board and give each child a sticky note for writing their name. Have the child place the sticky note in the graph over the distance their car traveled.
If your builder wants to keep exploring real-world automotive designs and aerodynamics at home:
- LEGO City Hot Rod (60485): Perfect for young learners, this 81-piece, vibrant drag racer for ages 5+, featuring real-rubber tires, a visible engine, and a detailed, accessible cockpit. This educational set helps children identify key car anatomy—including the chassis, wheels, windshield, and lights.
- LEGO Technic™ Bugatti Bolide (42151): Fire up a young mechanic’s passion with this 905-piece hypercar replica for kids aged 9 and up. Rather than just snapping bricks together, children get a hands-on lesson in automotive mechanics by building a functioning W16 piston engine and a working steering system. This set transforms complex engineering into an approachable, tactile physics lesson.
- LEGO Icons Ford Model T (11376): Celebrate an icon of automotive history with this 1,060-piece replica of the classic 1910s automobile, featuring a folding fabric roof, a working steering system, and a detailed engine. It provides a wonderful opportunity for a child to complete a complex build alongside an adult. It serves as a perfect educational dovetail to show kids how engineering has completely changed the way cars are built by continuously iterating design ideas over the last century.